
If you’re new to Docker and containers, then setting up Apache Docker Container is a great way to start. Creating an application on Docker is a huge benefit because of its light-weighted technology and security.
In this tutorial, you will learn how to set up an Apache Docker Container on Ubuntu. Use this tutorial to learn to get started with Docker and come away with an Apache webserver too!
Prerequisites
If you’d like to follow along step-by-step, ensure you have the following and Ubuntu 14.04.4 LTS or greater machine with Docker installed in this tutorial. This tutorial uses Ubuntu 18.04.5 LTS with Docker v19.03.8 and a public IP address of 13.213.48.113.
Setting up the Apache Docker Container
Assuming you’ve installed Docker already, let’s first set up the Apache container. Later, you’ll learn how to start it up.
One of the easiest ways to quickly bring up an Apache Docker container is downloading an existing container image from the official Docker registry Docker Hub. For this example, you’ll be downloading and running a Docker container called Apache.
With a few Docker commands, you’ll be running an instance of Apache in no time. To do so, follow the steps below.
Note: This tutorial does not cover running Docker commands in-depth. To learn more about Docker commands, visit the Docker command line documentation page.
1. Open a terminal on your Ubuntu machine.
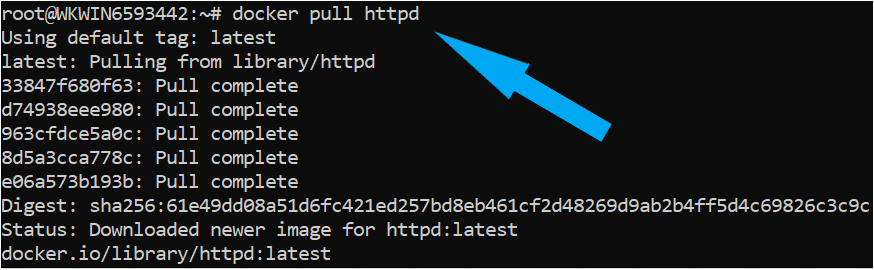
2. Download the Docker image, which contains Apache called httpd, by running the docker pull command below. This command will download or pull the Apache image from the Docker registry, as shown below.
# Pulls the Docker Images from docker registry to your local machine.
docker pull httpd
The screenshot below shows the expected result when pulling the image from Docker Hub.
3. Next, confirm you’ve downloaded the image by running the docker images command below to list all images available on your computer.
# To check the docker images
docker images
As you can see below, you now have one Docker image, which is the image you downloaded from Docker Hub.

Running the Apache Container using Docker Command.
In the previous section, you downloaded the Docker image from the Docker hub. You’re now ready to create a container from that image. To run the Apache container, you will need to run the Docker command as follows:
1. Invoke the docker run command to create a new container based on your downloaded Apache Docker image.
# Run a new docker container called docker-apache (--name)
# Map the local computer's port 80 to the container's port 80 (-p 80:80)
# In detached mode (-d)
# Using the Apache image
docker run -d --name docker-apache -p 80:80 -d httpd
The docker run command then returns the unique container ID of the container you’ve just created. Save this container id in the highlighted box below to the future if you wish to delete or remove the container.

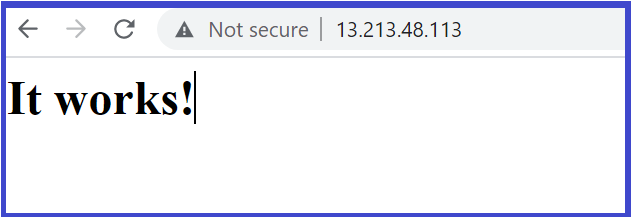
2. Once the Apache container is running, verify if you can access the Apache web interface by navigating to Public-Ip-address:80 using your web browser. If you can see the same message, as you can see below, then you’ve successfully started your Apache Docker container.
Make sure Ubuntu 14.04.4 LTS Machine has a Port 80 inbound port allowed in the security group.
3. Finally, stop the container if you don’t need it running anymore by running the docker stop command below. This command will gracefully stop the container instance.
# Stop the container with ID aaaee64a4512 Make sure to change the container ID value to yours.
# Note: specifying the first 12 characters of the container ID is enough.
docker stop aaaee64a4512
Alternatively, you can also stop a running container by specifying its name in the
docker stopcommand (docker stop docker-apache).
Running Apache Docker Container from Docker file
In the previous section, you learned how to launch an Apache Docker container by running the default httpd Docker image. What if you need to update the base image to display different content or expose it on a different port?
Deploying a container using Docker file allows you to remove the manual image creation step when you’re testing the same setup on a different OS. The Docker file approach is an automated script of Docker images.
Let’s create a Docker file and run a container from it.
1. Create a folder named ~/apache-server-docker-demo, then change (cd) the working directory to that folder.
mkdir ~/apache-server-docker-demo
cd ~/apache-server-docker-demo
2. Create another file, copy/paste the below configuration and save the file as an index.html inside of the ~/apache-server-docker-demo directory. The index.html file is an HTML page which will display This tutorial will teach how to Run Apache container in docker once container starts which you will see later in the course.
<!DOCTYPE html>
<html lang="en">
<head>
    <meta charset="UTF-8">
    <title>This tutorial will teach how to Run Apache container in docker .</title>
</head>
<body>
    <h1>This tutorial will teach how to Run Apache container in docker , lets GO!</h1>
</body>
</html>
3. Create another file, copy/paste the below configuration, and save the file as Docker file inside the ~/apache-server-docker-demo directory. When complete, Docker will use this DockerFile to run all the commands necessary to build a new Docker image on top of any base image.
The DockerFile below contains various steps/instructions that will build the Apache container:
Maintainer– Maintainer instruction provides information about the author who manages this file.FROM– The FROM instruction initializes a new build stage and sets the Base Image for subsequent instructions. In the below code snippet,centos:7is the base image.COPY– COPY command copies a file from the host machine (Docker host) to the container. The ****index.html you created earlier on Docker host will be copied to the containers /var/www/html directory.EXPOSE– The EXPOSE instruction informs Docker that the container listens on the specified network ports at runtime. Apache webserver is by default exposed onPort 80.
# Instruction for Dockerfile to create a new image on top of the base image (httpd)
FROM httpd:2.4
MAINTAINER shanky@adamtheautomator.com
COPY index.html /var/www/html/
EXPOSE 80
4. Next, verify all of the required files below in the folder by running the tree command.

5. Next, build the image by running the docker build command. The t flag is used to tag the image apache-server with v1 and. signifies the present working directory.
# Building the docker Image
sudo docker build  -t apache-server:v1 .
docker build command When Docker builds runs, it returns various attributes. You’ll see one of those attributes is REPOSITORY. The REPOSITORY name is apache-server, and the image is tagged with version v1, as shown below.

6. Finally, run the apache container using the newly built image by running the docker run command.
The p flag publishes a container’s port(s) to the host, which is 80:80. The -it flag instructs Docker to allocate a pseudo-terminal connected to the container’s stdin.
# Running the Apache container using the newly built image
docker run -it -p 80:80 apache-server:v1
7. Finally, verify if you can access the Apache web interface by navigating to Public-ip-address:80 using your web browser. You’ll see this message on the web interface because you created the index.html file, and Docker copied it to the container when it started up.

Conclusion
This tutorial aimed to help you through the process of setting up an Apache Docker container using Docker images. You learned how to launch Apache containers using Docker files, with which you are allowed to edit and build customize containers of your choice.
So what are you going to build on the Apache server Docker image?