
Running Jenkins in standalone mode will be problematic if you have multiple busy build processes. You can use container orchestration such as a scalable Jenkins Kubernetes deployment to solve this issue.
The scalable Jenkins deployment allows you to run builds in parallel mode with self-healing support. Each Jenkins build will be faster, too, since running in a distributed environment.
Keep reading, and you will learn to install and deploy scalable Jenkins on the Kubernetes cluster.
Prerequisites
This tutorial will be a hands-on demonstration. To follow along, be sure you have the following requirements:
- You must already have a Kubernetes cluster on Linux. This tutorial uses the Kubernetes v1.22.3 on Ubuntu 20.04.
- You’re already installed the kubectl tool is installed on your local machine.
Building Jenkins Controller Docker Image
To set up scalable Jenkins deployment on Kubernetes, you must create a custom image for the Jenkins Controller
The Jenkins controller is where you can add Kubernetes to your Jenkins build system. The Jenkins controller must include the Jenkins Kubernetes plugins that allow you to run a dynamic Jenkins agent inside the Kubernetes cluster.
Now, follow these steps to build a custom Docker image for the Jenkins controller.
1. Open your SSH client and log in to your Kubernetes node to create a new Docker custom image.
If you have a private Docker image registry, you can create the custom image locally on your computer and push/upload the custom image to the private Docker registry.
2. Run the below docker commands on your terminal to download two images; jenkins/jenkins:lts-jdk11 and jenkins/inbound-agent.
You’ll be using the jenkins/jenkins:lts-jdk11 to build a custom image for the Jenkins controller. Also, you’ll be using the jenkins/inbound-agent to set up the Jenkins agent on the next step.
# download image jenkins/jenkins:lts-jdk11
docker pull jenkins/jenkins:lts-jdk11

# download image jenkins/inbound-agent
docker pull jenkins/inbound-agent3. Next, run the below command to create a new project directory jenkins for storing custom image configuration and change the working directory.
# create a new project directory jenkins
mkdir -p jenkins; cd jenkins/
4. Create a new file called Dockerfile using your preferred editor (nano, vim, etc.) and populate the file following configuration.
With this configuration, you will be creating a new custom Docker image based on jenkins/jenkins:lts-jdk11 that includes the blueocean and kubernetes plugins.
The kubernetes plugin allows you to create a scalable Jenkins agent on the Kubernetes environment.
# new image based jenkins:lts-jdk11
FROM jenkins/jenkins:lts-jdk11

# Pipelines with Blue Ocean UI and Kubernetes
RUN jenkins-plugin-cli --plugins blueocean kubernetes
Save and close the file.
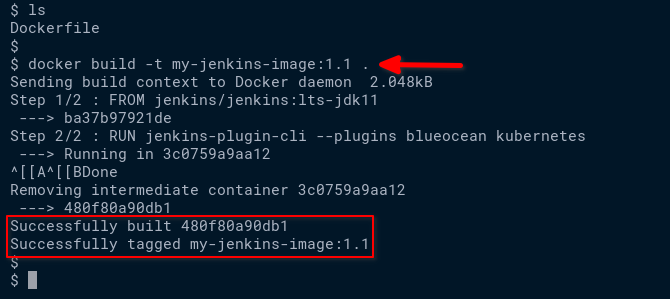
5. Next, run the below command to build a new Docker custom image with the name my-jenkins-image:1.1.
You can change the name of the new Docker image if you prefer. Also, this process may take several minutes because there is a lot of Jenkins plugins installation.
# build custom image my-jenkins-image:1.1
docker build -t my-jenkins-image:1.1
After the build, you will see a message such as Successfully built [random_characters], like the screenshot below.
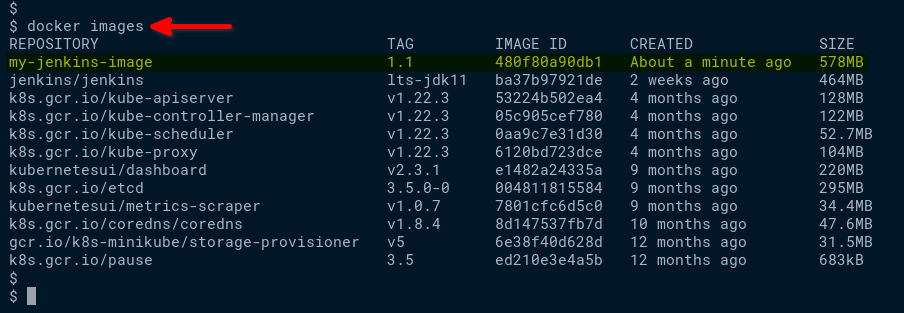
6. Lastly, run the below command to verify the new Docker custom image you created.
# checking list docker images
docker images
You should see the new Docker image my-jenkins-image:1.1 is available on the Kubernetes host.
Creating a Jenkins Kubernetes Namespace
Now you’ve successfully built the custom Docker image for the Jenkins controller. The next step is to create a new Kubernetes namespace to store all Jenkins deployment resources.
Namespaces allow virtually isolating resource groups within a single cluster. To create the namespace, follow these steps.
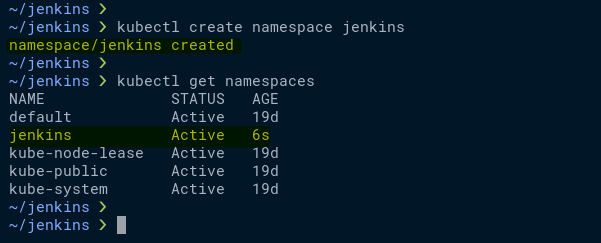
Run the kubectl command below to create a new Kubernetes namespace called jenkins.
# create namespace jenkins
kubectl create namespace jenkins
After creating the namespace, run the below command to verify the list of the available namespaces on your Kubernetes environment.
# checking list namespace
kubectl get namespaces
Now you should see the Kubernetes namespace jenkins on your Kubernetes environment.
Creating a Jenkins Kubernetes Deployment
After you’ve created the jenkins namespace, you’re now ready to create a Jenkins Kubernetes deployment. In this deployment, you will be running the Jenkins controller pod, which is based on the custom image my-jenkins-image:1.1, and exposes port 8080 for client access.
1. Create a new YAML file jenkins-deployment.yaml using your preferred editor and populate the following configuration.
With this configuration, you will be creating a new Kubernetes deployment named jenkins for the Jenkins controller.
The Jenkins controller pod will be based on the my-jenkins-image:1.1 custom image and expose port 8080 for access.
apiVersion: apps/v1
kind: Deployment
metadata:
  name: jenkins # create deployment jenkins
spec:
  replicas: 1 # create only 1 pod
  selector:
    matchLabels:
      app: jenkins
  template:
    metadata:
      labels:
        app: jenkins # app name as jenkins
    spec:
      containers:
      - name: jenkins # create jenkins container
        image: my-jenkins-image:1.1 # based on image my-jenkins-image:1.1
        ports:
        - containerPort: 8080 # expose port 8080 for client access
        volumeMounts:
        - name: jenkins-home
          mountPath: /var/jenkins_home
      volumes:
      - name: jenkins-home
        emptyDir: { }
Save and close the file.
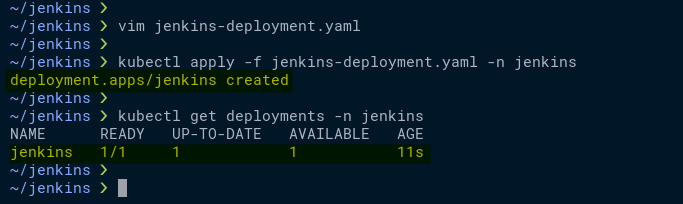
2. Next, run the below kubectl command to create a new deployment under the jenkins namespace (-n)
# create jenkins deployment
kubectl apply -f jenkins-deployment.yaml -n jenkins
3. Now, run the below command to verify the list of available deployments in the jenkins namespace.
# checking list deployments
kubectl get deployments -n jenkins
You should see the deployment jenkins with only 1 pod, and it’s running.
4. Lastly, run the following command to check available pods in the jenkins namespace and check the logs of the jenkins pod.
# checking list pods on Jenkins namespace
kubectl get pods -n jenkins

# checking logs for jenkins-xxx pod
kubectl -n jenkins logs jenkins-xxx
You should see the pod named jenkins-xxx is running and detailed logs of the jenkins pod.
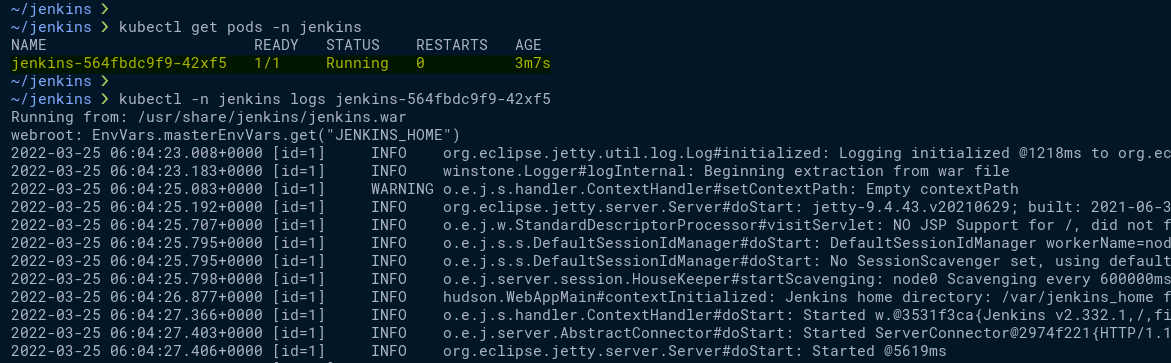
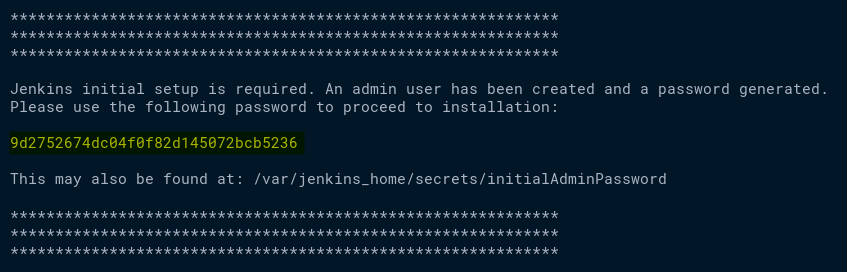
Scroll to the bottom of the log messages and copy the initial Jenkins admin password to your notes. You’ll be using the password for setting up Jenkins installation in the next step.
Creating a Jenkins Kubernetes Service
You’ve now created the deployment for the Jenkins controller pod. At this point, the Jenkins controller is not yet accessible outside of the Kubernetes environment. Follow the below steps to allow clients access to the Jenkins controller.
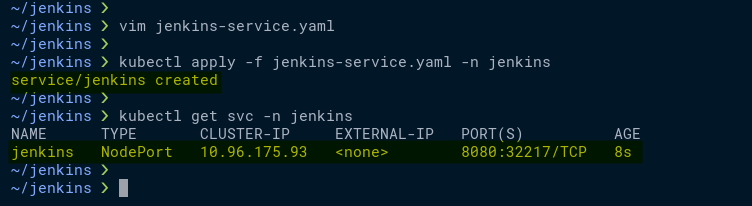
1. Create a new YAML file jenkins-service.yaml using your preferred editor and populate the following configuration.
Using this YAML configuration, you will be creating a new Kubernetes service type NodePort with port 8080 for the jenkins deployment.
apiVersion: v1
kind: Service
metadata:
  name: jenkins # service with name jenkins
spec:
  type: NodePort # service type NodePort
  ports:
  - port: 8080
    targetPort: 8080 # target port on the jenkins pod
  selector:
    app: jenkins
2. Next, run the below kubectl command to create a new jenkins service in the jenkins namespace.
# create jenkins service
kubectl apply -f jenkins-service.yaml -n jenkins
3. Lastly, run the below command to check the available services in the jenkins namespace.
# check list service on jenkins namespace
kubectl get svc -n jenkins
Now you should see the jenkins service opens port 32217 for the Jenkins controller pod. The port number assignment may be different on your deployment.

Completing the Jenkins Installation
At this point, you’ve completed the deployment of the jenkins controller on Kubernetes. The next step is to set up the Jenkins from the web browser to complete the installation.
1. Open a web browser on your computer and type your Kubernetes cluster IP address and NodePort of the jenkins service (e.g., http://SERVER-IP:32217).
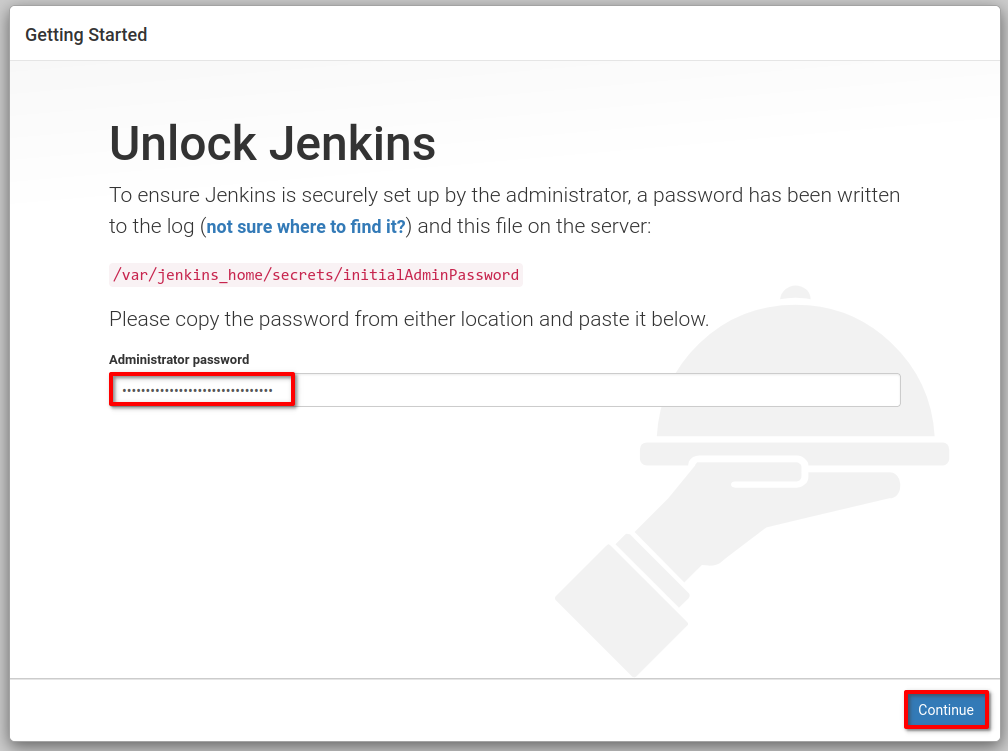
2. On the Unlock Jenkins page, type in the initial admin password and click Continue.
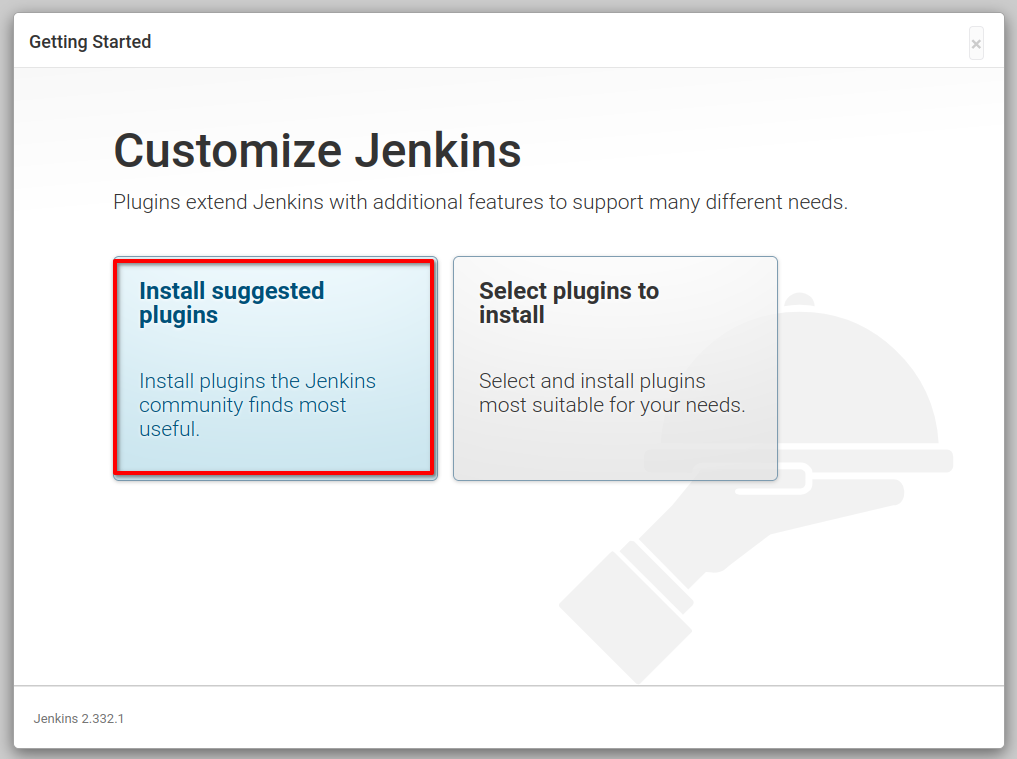
3. Now click the Install Suggested Plugins option to install Jenkins plugins.
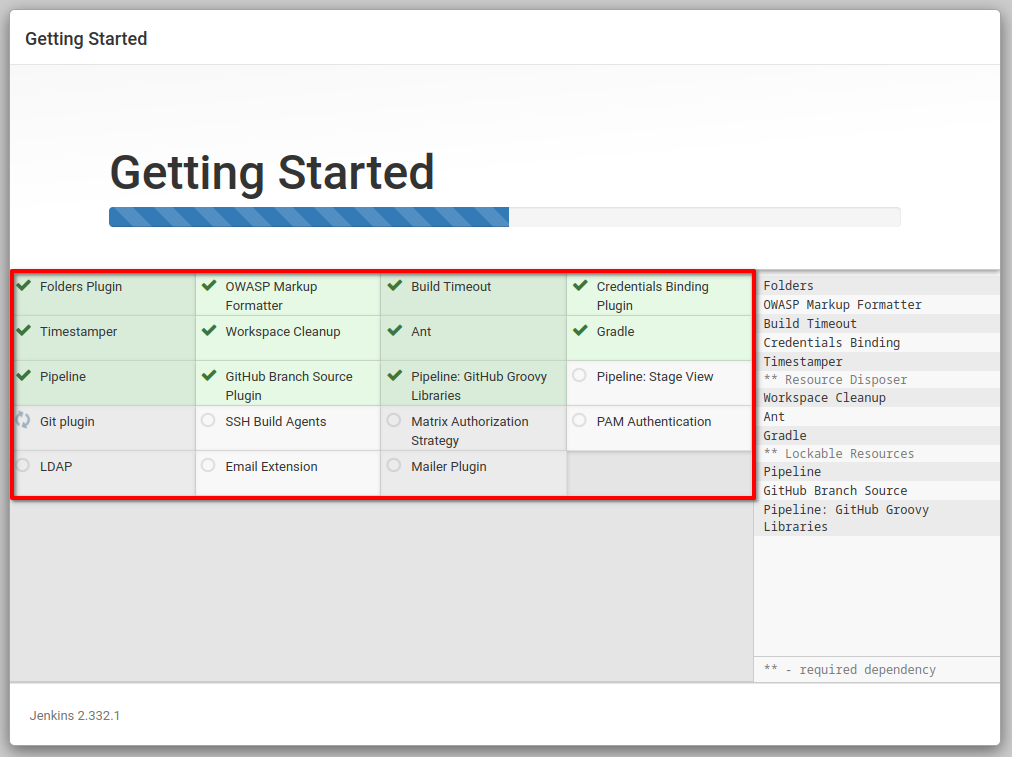
Below is the screenshot of the Jenkins plugins installation progress. Wait for the installation to complete.
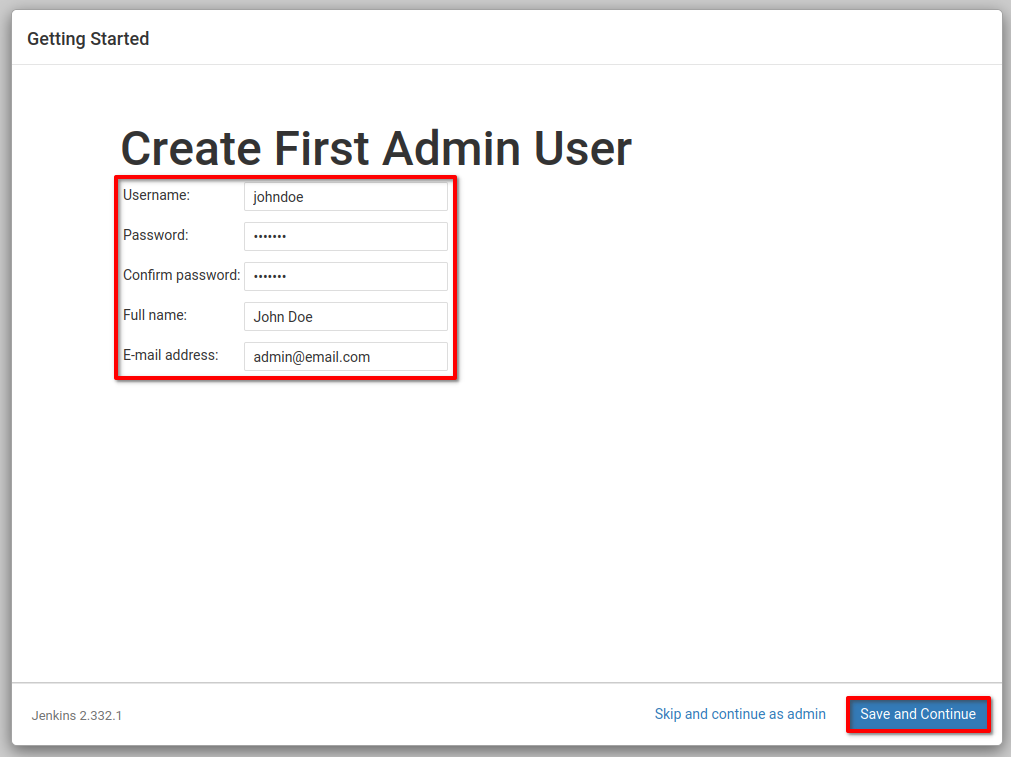
4. On the Create First Admin User step, type in the username, password, and email address to create a new Jenkins admin user. Click Save and Continue.
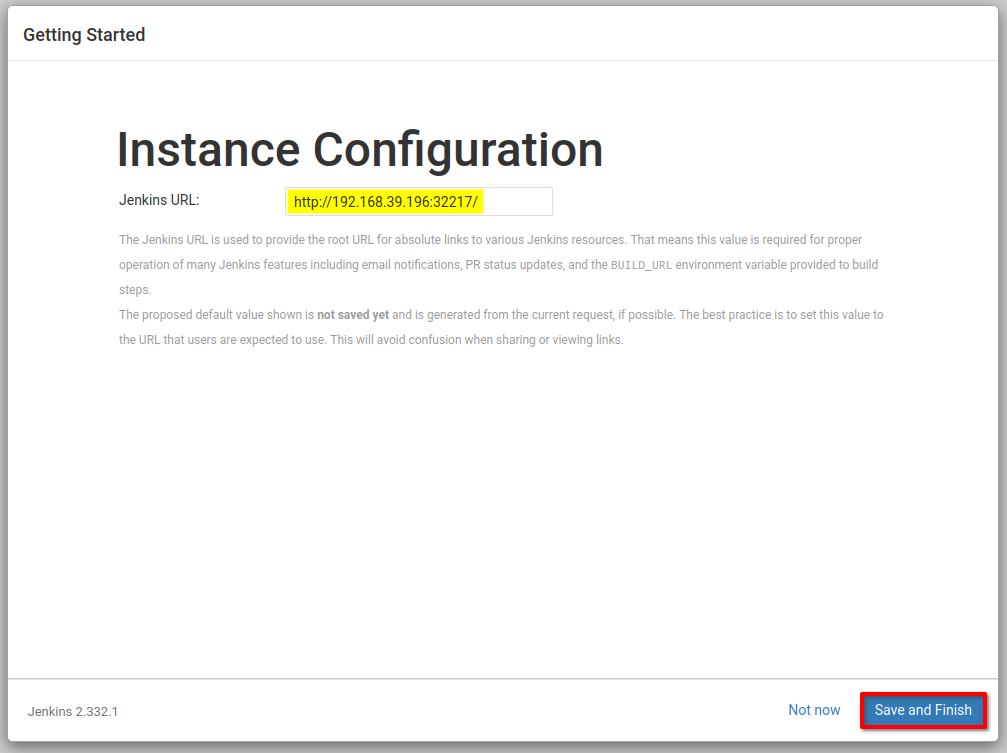
5. Leave the Jenkins URL configuration as default and click Save and Finish.
6. Now, click Start using Jenkins to complete the configuration.
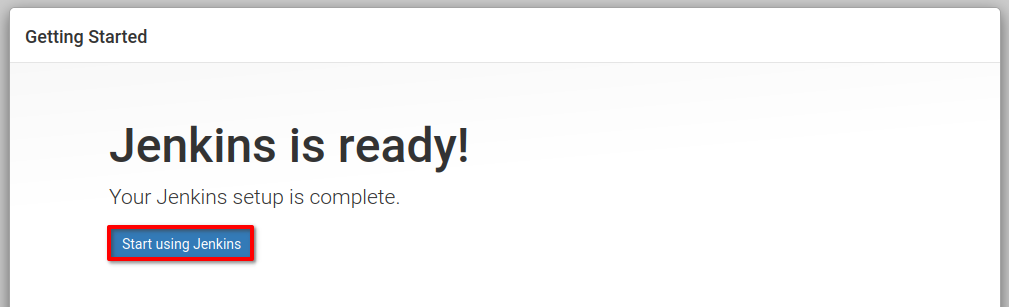
You will now see the welcome message on the Jenkins dashboard.

Setting Up the Kubernetes Jenkins Plugin
To create scalable Jenkins Kubernetes deployment, you will need to set up the Kubernetes Jenkins plugin on the Jenkins controller.
The Kubernetes Jenkins plugin will automatically spawn new Jenkins agent/slave pods and run the Jenkins job inside that pod. The plugin is also responsible for destroying the Jenkins agent/slave pods after Jenkins completes the build.
1. Before setting up the Kubernetes Jenkins plugin, go back to your terminal shell and run the below command to get the Kubernetes control plane’s IP address and port number.
# checking Kubernetes cluster-info
kubectl cluster-info
You should see the detailed address of the Kubernetes control plane. In this demo, the Kubernetes control plane is https://192.168.39.196:8443/.

2. Next, run the below command to check the internal IP address of the Jenkins controller pod. Replace the jenkins-xxx value with your pod’s name.
You’ll be using the internal IP address of the Jenkins controller pod for setting up the Kubernetes Jenkins plugin.
# check pod IP address
kubectl -n jenkins describe pod jenkins-xxx
As you can see on the screenshot below, the IP address of the Jenkins controller pod is 172.17.0.3.

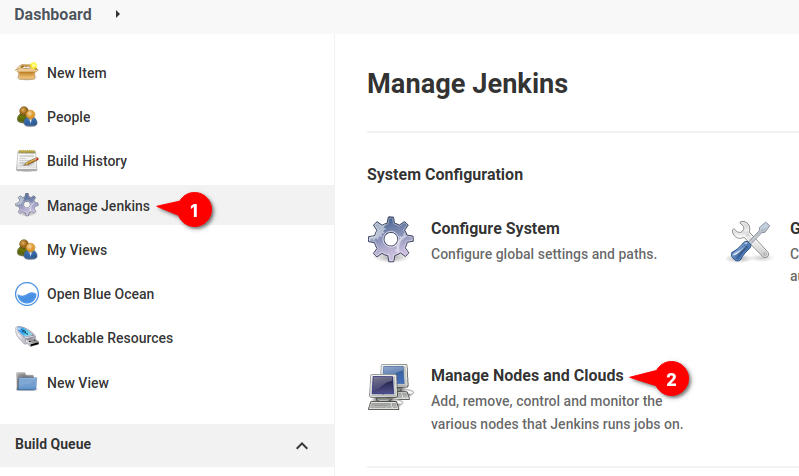
3. Now, back to the Jenkins dashboard, click Manage Jenkins —> Manage Nodes and Clouds to add another Jenkins node or cloud configuration.
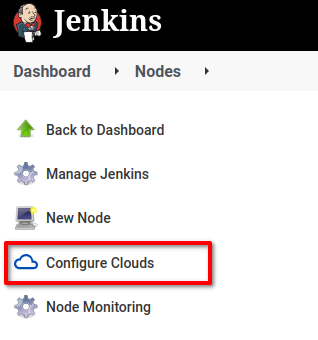
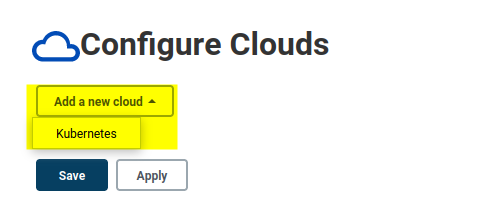
4. Click the Configure Clouds menu on the left side.
5. Click Add new cloud and select Kubernetes to add your Kubernetes cluster.
6. Now add your Kubernetes cluster to the Jenkins controller with the following details.
In the below example, the Kubernetes cluster name will be kubernetes-test with the Kubernetes URL https://SERVER-IP:8443/, and the namespace is jenkins.
Click the Test Connection button to verify the connection to your Kubernetes cluster. If you see the output message such as Connected to Kubernetes v.1xx, then the authentication to the Kubernetes cluster is successful.
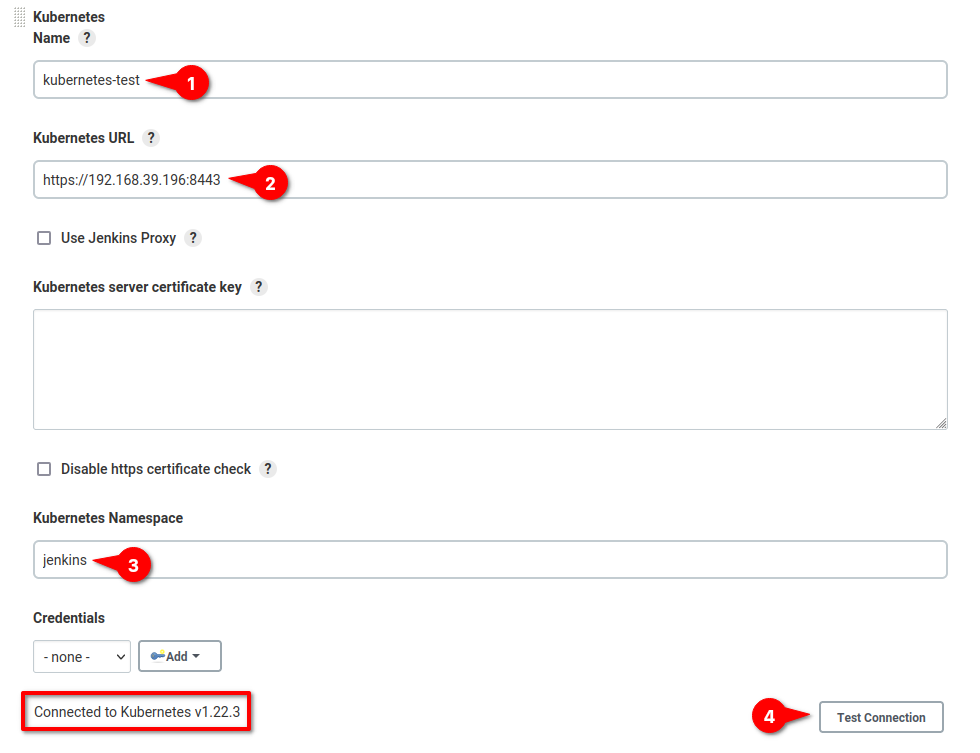
7. Next, input the Jenkins URL section using the internal IP address of the Jenkins controller pod 172.17.0.3 and the default port 8080.

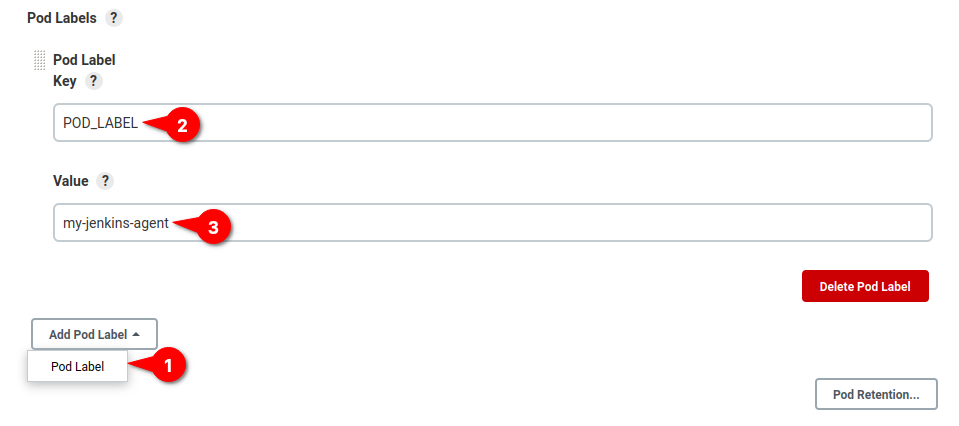
8. Scroll down to the Pod Labels section. Click the Add Pod Label button and select Pod Label. Doing so creates a label for all pods that the Kubernetes Jenkins plugin will create.
Type POD_LABEL as the Key, and the Value is my-jenkins-agent.
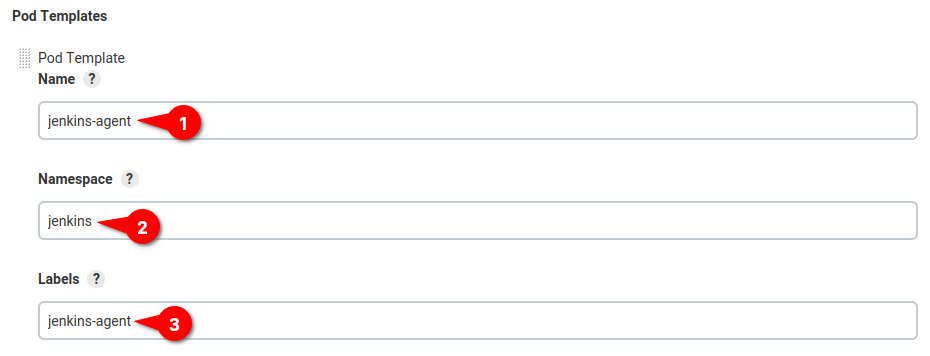
9. Now, click on the Add Pod Template button to create a new template for the Jenkins agent pod. Type jenkins-agent as the template name, the default prefix of the pods’ names. Click Pod template details to get a detailed configuration.
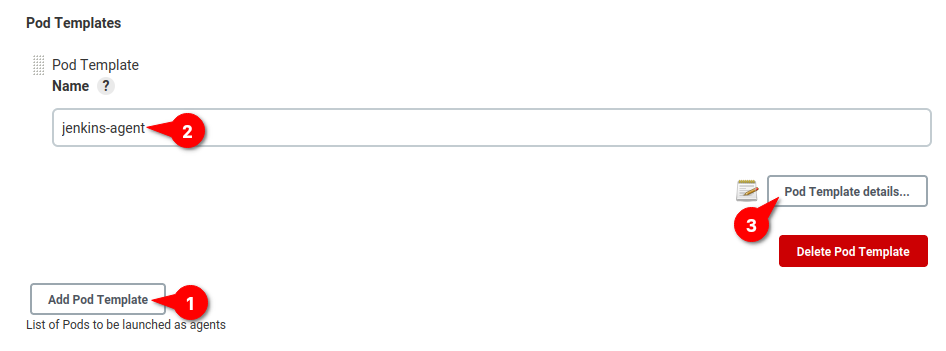
As you’ve entered previously, the pod name is jenkins-agent (default prefix pod name). All Jenkins agent pods will be available at the jenkins namespace, with an additional label as jenkins-agent.
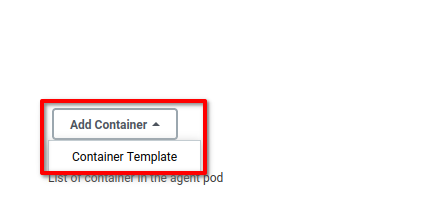
10. Scroll to the bottom page, click Add Container, and select Container Template. At this time, you’ll be setting up a container template for the Jenkins agent.
11. Under the container template, ensure that the Name is jnlp, the Docker Image is jenkins/inbound-agent, and the Working directory should be /home/jenkins/agent.

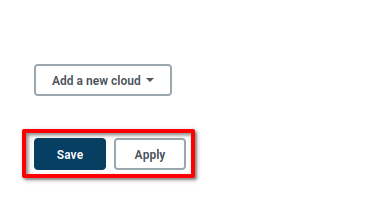
12. Lastly, click the Save and Apply to apply buttons.
Creating the Jenkins Builds for Testing
You’ve completed the Jenkins Kubernetes deployment, time to verify if it works! How? By creating a basic Jenkins build. Proceed with the below steps to do so.
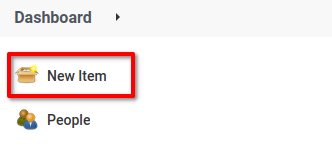
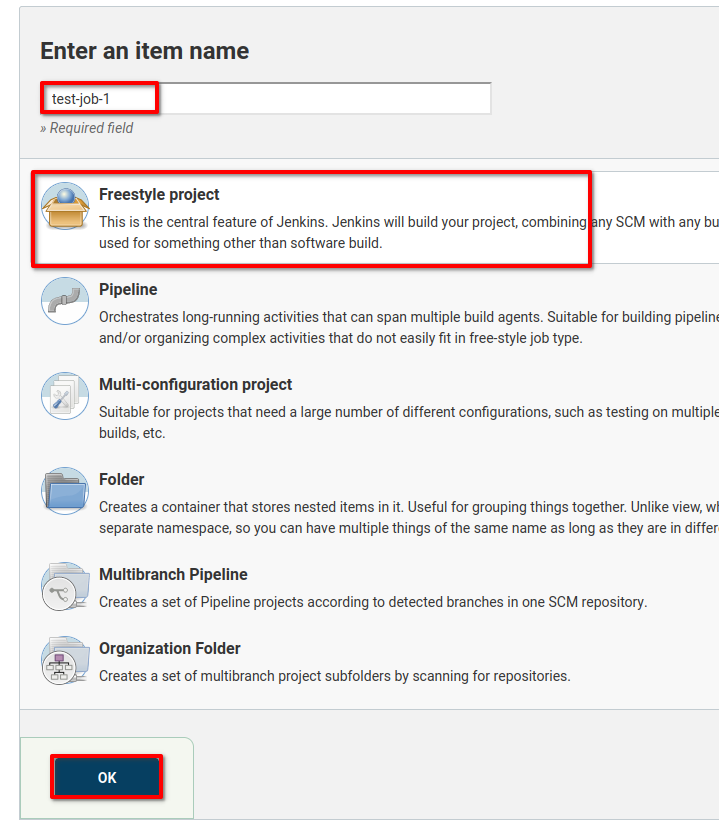
1. Click the New Item menu on the left to create a new Jenkins job on the Jenkins dashboard.
2. Enter the job name as test-job-1, click Freestyle project, and click OK.
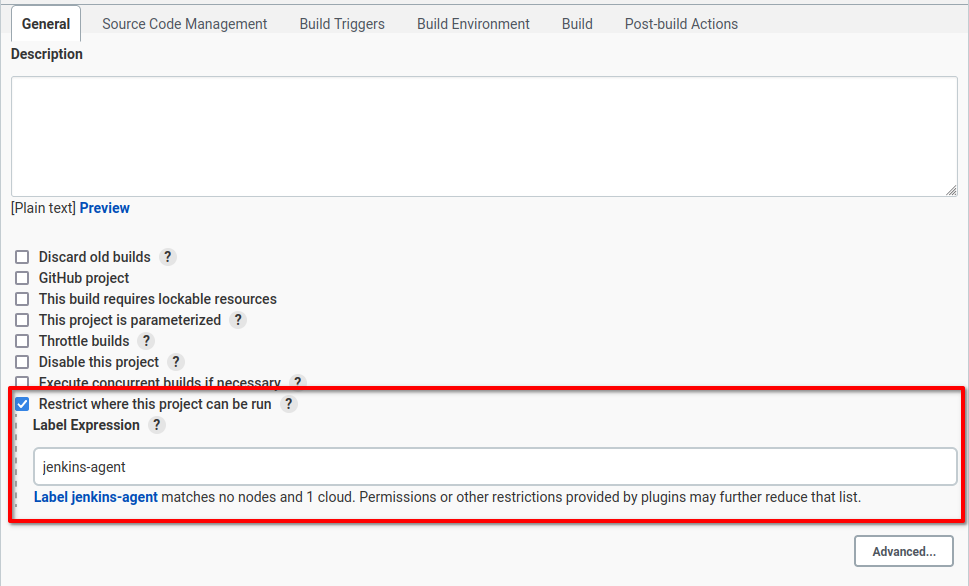
3. Under the General tab, check the Restrict where this project can be run box and type in jenkins-agent as the Label Expression.
The Label Expression must be the same as the label on the Pod Template configuration.
4. Next, move to the Build section, click the Add build step, then select Execute shell option to create a new build.

5. Copy the below code and paste it into the Command box.
# sleep for 60sec
sleep 60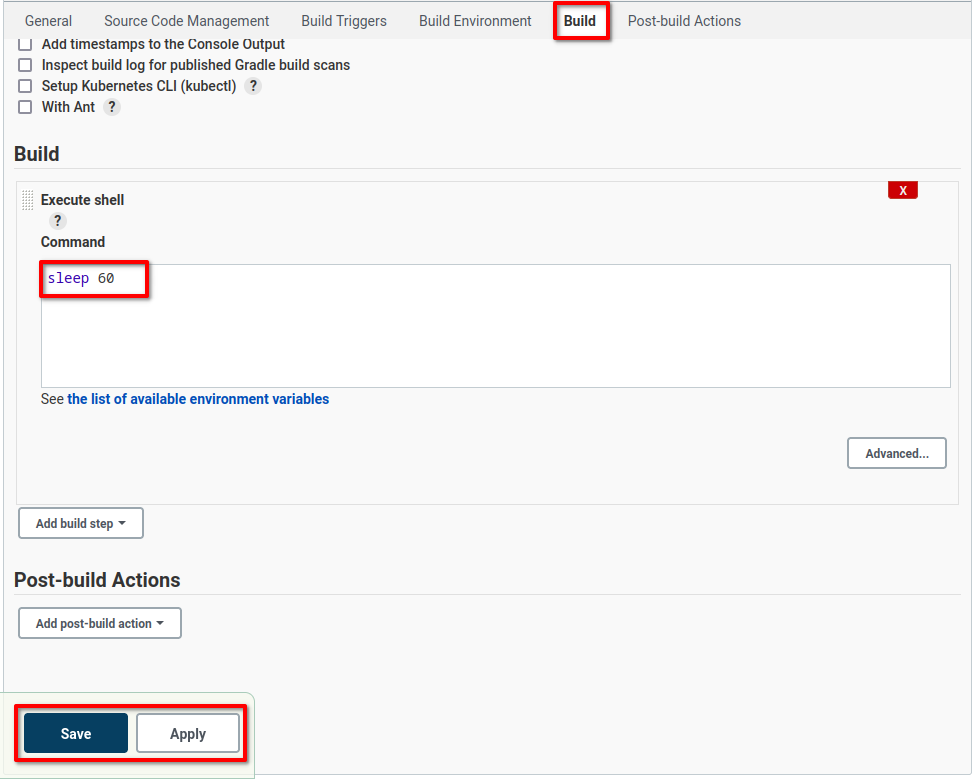
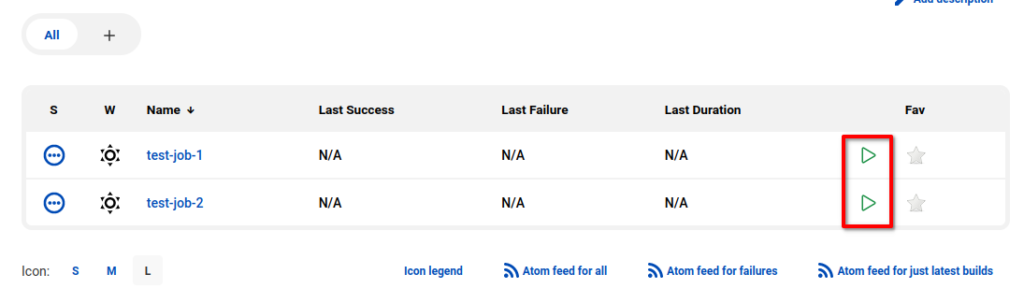
6. Lastly, create another Jenkins build called test-job-2 with the same configuration as the test-job-1.
Now, you should see the two Jenkins build on the dashboard.
Running the Jenkins Kubernetes Build
You’ve created two Jenkins builds to test the scalable Jenkins Kubernetes installation. Now you will be running both Jenkins builds on the Kubernetes cluster.
When you run the Jenkins build, the Jenkins controller will create a new pod named jenkins-agent-random_string. After the build is complete, Jenkins will destroy the pod automatically.
Follow these steps to start running the Jenkins build.
1. Click the play button next to the two Jenkins jobs on your dashboard; test-job-1 and test-job-2.

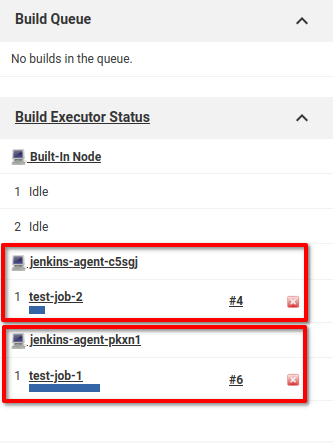
2. On the bottom left menu, you will see build status.
As you can see below, the test-job-1 runs on the Kubernetes pod called jenkins-agent-pkxn1, while the test-job-2 runs on the pod called jenkins-agent-c5sgj.
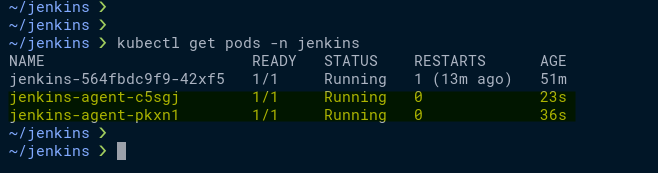
3. While the build is running, go back to your terminal shell and run the below kubectl commands to list the pods running under the jenkins namespace.
# checking pods on jenkins namespace
kubectl get pods -n jenkins
And you should see the pods jenkins-agent-pkxn1 and jenkins-agent-c5sgj are running. When the build completes, Jenkins will destroy these pods automatically.
That’s it! You have completed a scalable Jenkins Kubernetes deployment and confirmed that the configuration is working as intended.
Conclusion
In this article, you’ve learned how to deploy scalable Jenkins on Kubernetes using the Kubernetes plugin. Also, you’ve learned the basic configuration of the Kubernetes plugin on Jenkins and how to create and confirm successful Jenkins builds.
At this point, you can now implement the scalable Jenkins build using Kubernetes on your development. What’s next? Why not consider configuring Jenkins security on your deployment.
Thank you for reading, and happy learning!