
Have you ever found yourself navigating the labyrinth of AWS networking, wondering if your fortress is as impenetrable as you hope? Well, fear not! Your journey to network nirvana begins here as you dive headfirst into the world of AWS Network Access Analyzer.
Throughout this tutorial, you’ll craft and dissect network analyses but effortlessly export and maintain a pristine digital landscape.
Get ready to enhance the security of your stronghold with AWS Network Access Analyzer!
Prerequisites
This tutorial comprises hands-on demonstrations. If you wish to follow along, ensure you have the following in place:
- An AWS account with active billing enabled – A free-tier AWS account will work for this tutorial.
- A running Virtual Private Cloud (VPC) within your region – The default VPC will suffice for this tutorial.
- A running EC2 instance within the VPC.
Creating a Network Analysis with the AWS Network Access Analyzer
Having fortified your AWS groundwork, you’ll dive into the heart of securing your network — creating a network analysis. AWS Network Access Analyzer is a service offered by Amazon Web Services (AWS) that helps you analyze and visualize your network connectivity in your VPC environment.
AWS Network Access Analyzer lets you gain insights into traffic flow between different resources within your VPC, empowering you to make informed security decisions.
To create your first network analysis using the AWS Network Access Analyzer, complete the steps below:
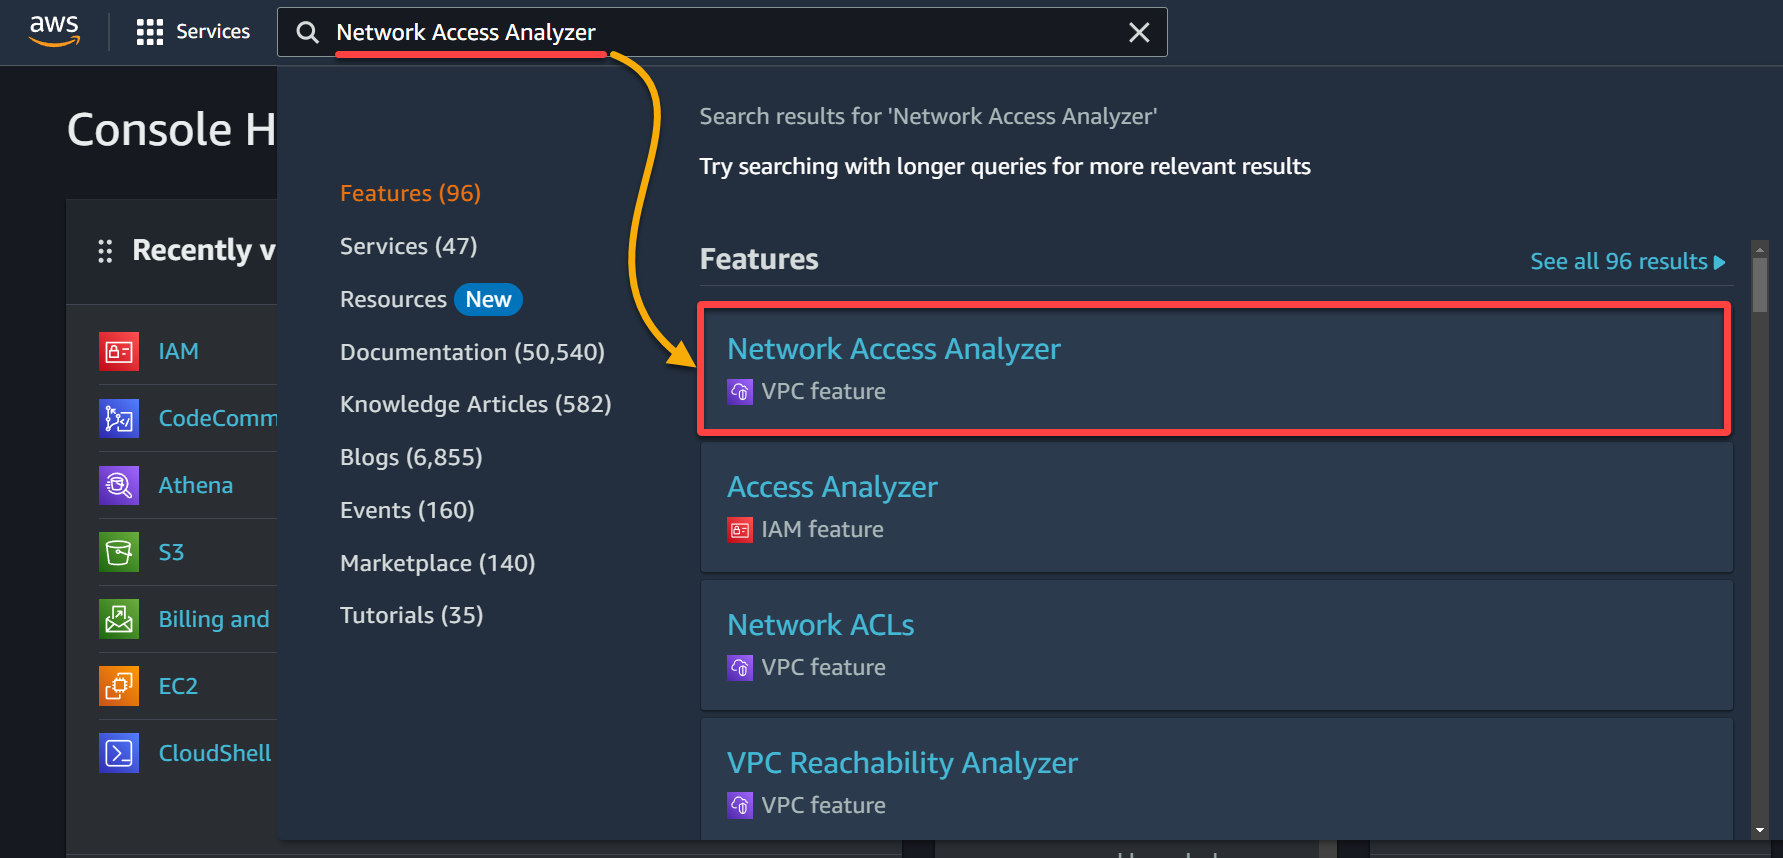
1. Open your favorite web browser, and log in to your AWS Management Console.
2. Once logged in, search for and choose Network Access Analyzer in the result.
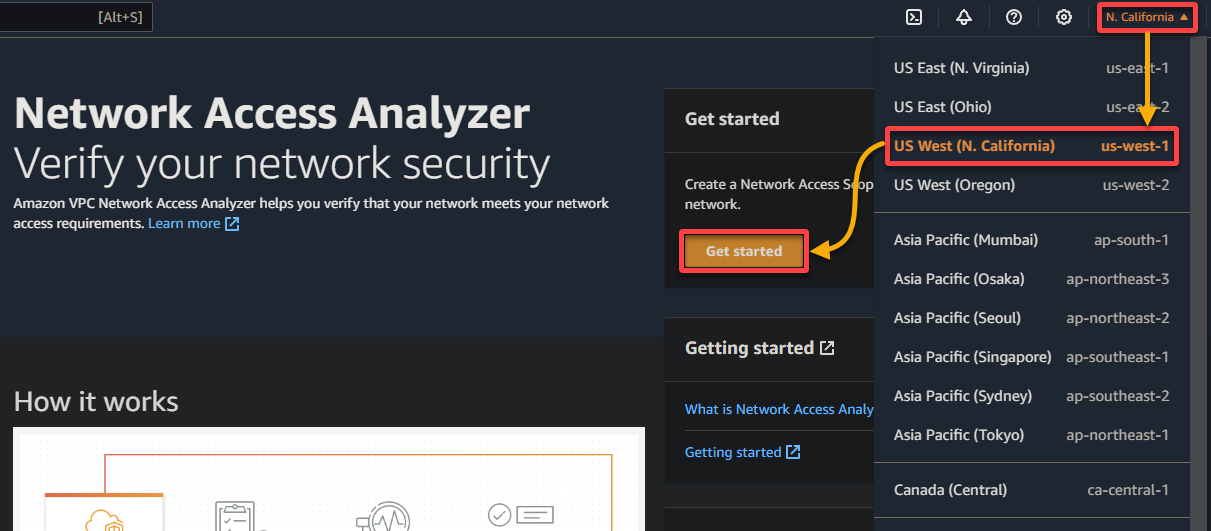
3. Next, select a region (top-right) where you wish to create the analysis and click Get started to set up your first network analysis.
💡 The Network Access Analyzer functions within a single AWS account and is confined to a specific AWS region. In the case of a complex infrastructure extending across multiple accounts or regions, you must employ the tool in each pertinent account and region. Doing so ensures a comprehensive assessment of your network paths.
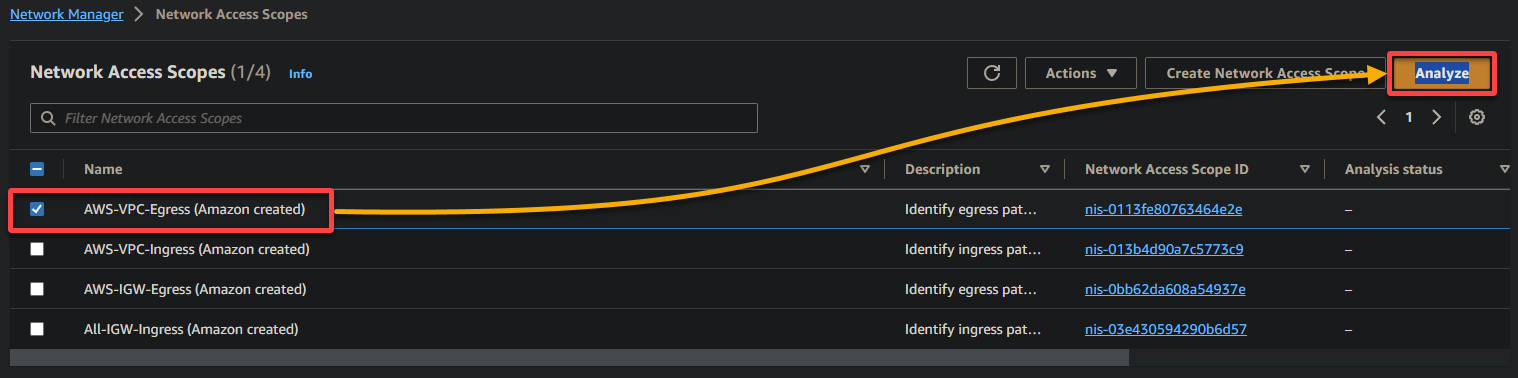
4. Select the desired network access scope and click on Analyzer to proceed. But this tutorial’s choice is AWS-VPC-Egress (Amazon created). Essentially, this configuration helps you track how traffic enters any VPC within your AWS account.
But when necessary, below are the other network access scopes (Amazon created):
| Network Access Scopes | Details |
|---|---|
| AWS-VPC-Ingress | Focused on identifying and monitoring outbound network traffic paths from all VPCs within your AWS account. The configuration covers traffic flows to various destinations and helps you understand how traffic exits any VPC within your AWS account. |
| All-IGW-Ingress | Designed to identify and monitor network paths from Internet Gateways (IGWs) to all network interfaces within your AWS account. This configuration tracks and analyzes how traffic from the internet enters your AWS account and is directed to network interfaces associated with various AWS resources. |
| All-IGW-Egress | Focuses on identifying and monitoring network paths from all network interfaces within your AWS account to IGWs. This configuration helps you understand how traffic from your AWS resources exits to the internet through IGWs. |
This configuration encompasses traffic flows originating from various sources, including:
IGWs, peering connections with other VPCs, VPC endpoints, Virtual Private Network (VPN) connections, and Transit Gateways.
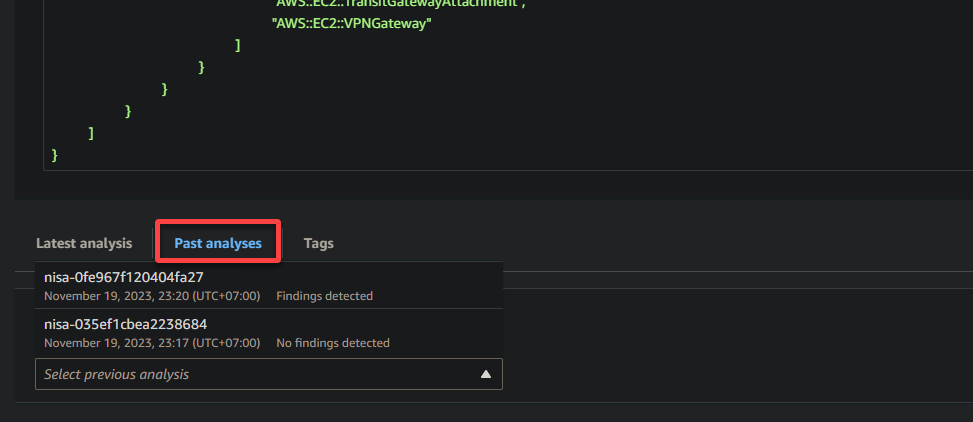
5. Now, expand the Network Access Scope definition to see the definition for your selected scope, and you will see a screen similar to the one below.
AWS furnishes this definition as a JSON object, which fundamentally outlines the scope. This scope encompasses network traffic paths originating from AWS EC2 Network Interfaces.
These network traffic paths are directed toward resources like Internet Gateways, VPC Peering Connections, VPC Endpoints, Transit Gateway Attachments, and VPN Gateways.
Conclusively, this definition establishes the criteria for analyzing and monitoring these particular network paths within the AWS environment.
Wait a few minutes while the Network Access Analyzer service creates your first network analysis. Keep this screen open; you’ll require it later to review the network analysis.

Reviewing the Network Analysis
With your first network analysis successfully created, you must look closer at the various findings and insights AWS Network Access Analyzer provided. Delve into the detailed analysis to uncover potential security gaps, unexpected network paths, and compliance issues within your infrastructure.
To access your analysis findings, follow these steps:
Scroll down, access the Past analyses tab, and click the dropdown field in the Network Access Scope page to see all your past analyses (if any).
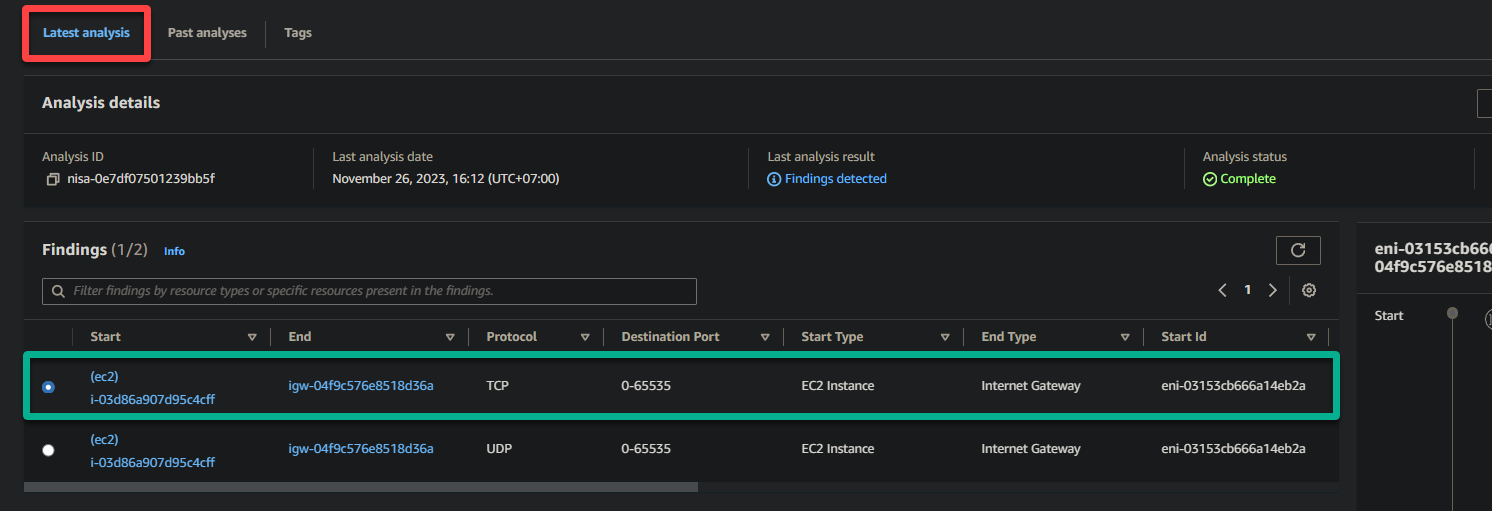
Next, click the Latest analysis tab to view your latest analysis, including the following findings and insights.
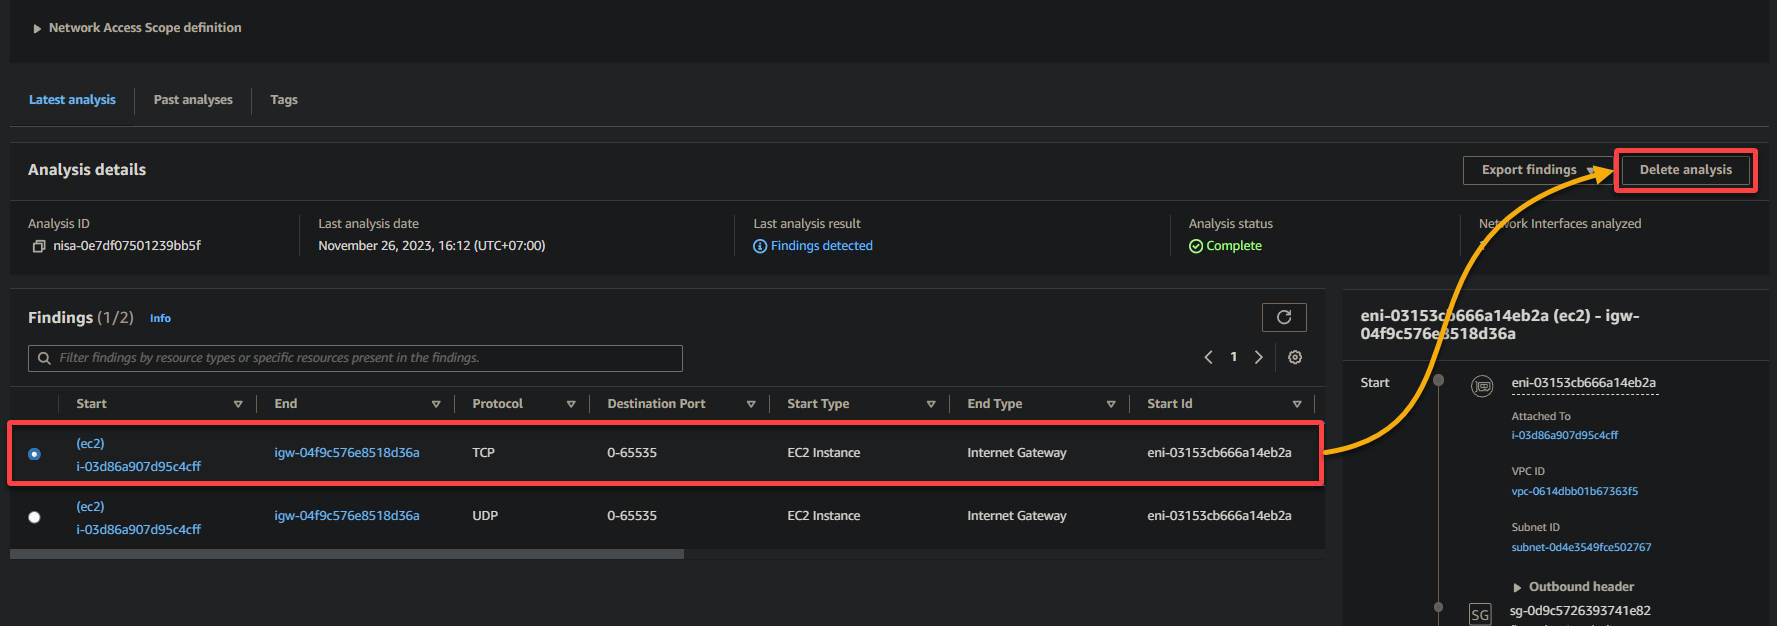
On the left, you will see the findings organized into columns. This tabular format allows you to quickly review and analyze the key details of your network traffic:
| Column | Details |
|---|---|
| Start | Indicates the start point of the network traffic flow. In this example, (ec2)i-03d86a907d95c4cff represents the source EC2 instance involved in the network communication. |
| End | Represents the endpoint of the network traffic flow. In this example, igw-04f9c576e8518d36a signifies the IGW the traffic is destined for. |
| Protocol | Specifies the communication protocol used for the traffic. In this case, TCP is utilized. |
| Destination Port | Indicates the port number at the destination end where the traffic is intended to be received. The range 0-65535 implies that traffic to any port within this range is allowed. |
| Start Type | Provides additional information about the source, which in this example is EC2 Instance. This column helps you identify the origin of the network traffic, such as an EC2 instance or another resource. |
| End Type | Offers details about the destination type, which in this case is IGW. This column’s data tells you the type of resource or endpoint the traffic is directed towards. |
By examining these findings, you can assess your network’s security posture and compliance with your intended access policies. You can identify any unexpected or unauthorized network flows and take appropriate action to secure your network.
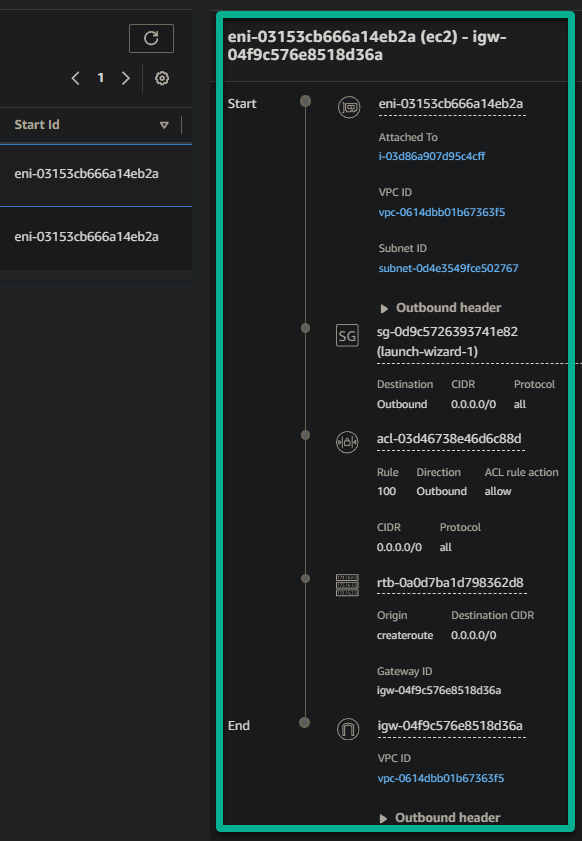
On the right pane, you’ll find a traffic visualization section. This feature provides a graphical representation of your network traffic, making it easier to visualize and understand the data flow within your network.
Within the traffic visualization section, expect to see the following:
- Network Topology – This visual representation often includes icons or nodes representing different network resources. These resources include EC2 instances, subnets, VPCs, network access control list (NACL), route table, security group, auto-scaling group, and so on.
Lines connecting these icons illustrate the flow of traffic between them.
- Flow Direction – The direction of traffic flows is usually indicated by the direction of lines connecting the network resources from top to bottom. This visualization helps you quickly identify if traffic flows from a source to a destination and vice versa.
Exporting Network Analyses
Gaining insights on your network analysis isn’t just about extracting information but turning data into a strategic advantage for your AWS environment. This purpose becomes possible with exporting your network analysis.
To export your analysis, fulfill the following steps:
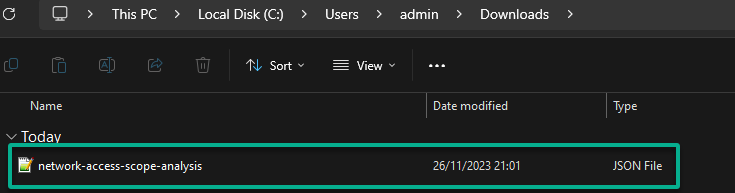
Select one analysis on the Network Access Analyzer console, click the Export findings dropdown field (top-right), and choose your desired export format, CSV or JSON.
Remember, CSV format is suitable for spreadsheets, while JSON is ideal for programmatic use, which is the choice of this tutorial.

Now, verify the network analysis has been successfully exported to your specified location, regardless of your chosen format.
Whether for documentation, further analysis, or sharing crucial insights with stakeholders, exporting is the key to maximizing your network analysis.
Deleting Obsolete Network Analyses
Besides extracting network analyses, periodically deleting outdated or unused analyses contributes to maintaining a lean and organized AWS environment. Regularly cleaning up obsolete analyses streamlines your Network Access Analyzer dashboard for greater clarity and ease of navigation.
To delete network analyses, proceed with the following:
1. Select one from the list of analyses, and click Delete analysis (top-right) to initiate deleting the analysis.
2. Now, type Delete when prompted and click Delete to proceed.
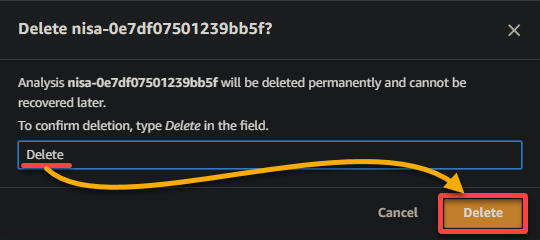
3. Lastly, ensure the deleted network analysis is no longer on the list.

Conclusion
As this AWS Network Access Analyzer tutorial ends, take a moment to recap your journey. You’ve learned how to create a network analysis, gaining insights into your AWS environment’s traffic paths. From there, you delved into reviewing analyses and deciphering findings to fortify your network’s security.
Additionally, you explored the practicality of exporting analyses, which transforms raw data into actionable intelligence. Finally, you deleted obsolete network analyses to maintain a streamlined AWS environment.
By regularly reviewing and analyzing your network traffic, you can identify and remediate any security vulnerabilities or unauthorized network flows.
Now, where to from here? Why not further level up your network security with other AWS security tools, such as AWS Network Firewall and Managed DDoS Protection – AWS Shield? These tools can help you gain additional insights into your network security posture. Let these insights empower you to make well-informed decisions and cultivate a more secure AWS environment!