

GitHub Actions provides a powerful way to automate workflows, allowing you to build, test, and deploy your code directly from your GitHub repository. But why not expand this capability with GitHub Action Runner Controllers (GitHub ARC)?
This tutorial is your ticket to getting more control over the environment where your workflows are executed. You’ll learn to leverage GitHub ARC to deploy and manage your self-hosted GitHub Runners on a Kubernetes cluster.
Stay tuned to scale and manage your runner instances dynamically with GitHub ARC!
Prerequisites
Prepare for some hands-on learning! Ensure to have the following in place to follow along in this tutorial:
- A Kubernetes cluster – This tutorial uses K3S running Kubernetes version 1.27.7
- kubectl installed and configured to interact with your Kubernetes cluster.
- A sample GitHub repository (i.e., eshiettjoseph/GitHub-arc-demo) where you plan to use your self-hosted runners.
- Helm package manager installed.
- A GitHub Personal Access Token with the ‘repo’ scope to authenticate the GitHub ARC.
- Cert-manager.
Setting Up the GitHub ARC
In your quest to optimize and streamline your workflow, the initial and crucial step involves setting up GitHub ARC on your Kubernetes cluster. This process, exemplified here through Helm, not only enhances the efficiency of your workflows but also empowers you to take full advantage of GitHub Actions in a Kubernetes environment.
To set up GitHub ARC on your Kubernetes Cluster with Helm, follow these steps:
1. Open a terminal and execute the following command to add the GitHub ARC Helm repository to your local Helm configuration as actions-runner-controller. This way, the GitHub ARC will be installed via helm from the repository you added.
After running this command, Helm will have information about the specified repository, and you can then use Helm commands to interact with the charts available in that repository.
helm repo add actions-runner-controller https://actions-runner-controller.github.io/actions-runner-controllerIf successful, you’ll see the following output.

2. Next, run the below helm upgrade command to perform the following to install the GitHub ARC Helm chart:
- Upgrade or
--installthe requested helm chart and create a Kubernetes namespace calledactions-runner-system. - Set a Helm value to true (
--set=authSecret.create=true) to enable creating an authentication secret.
- Set a Helm value for the authentication secret created (
--set=authSecret.github_token="YOUR_TOKEN"). Ensure you replaceYOUR_TOKENwith your personal access token. - Makes Helm
--waituntil all resources are ready before marking the installation as successful. - Sets the identifier (
actions-runner-controller) for managing this release with Helm and references the Helm chart (actions-runner-controller). This identifier follows the format: helm repository/helm chart.
helm upgrade --install --namespace actions-runner-system --create-namespace \
  --set=authSecret.create=true \
  --set=authSecret.github_token="YOUR_TOKEN" \
  --wait actions-runner-controller actions-runner-controller/actions-runner-controller
The output below indicates the installation is complete.
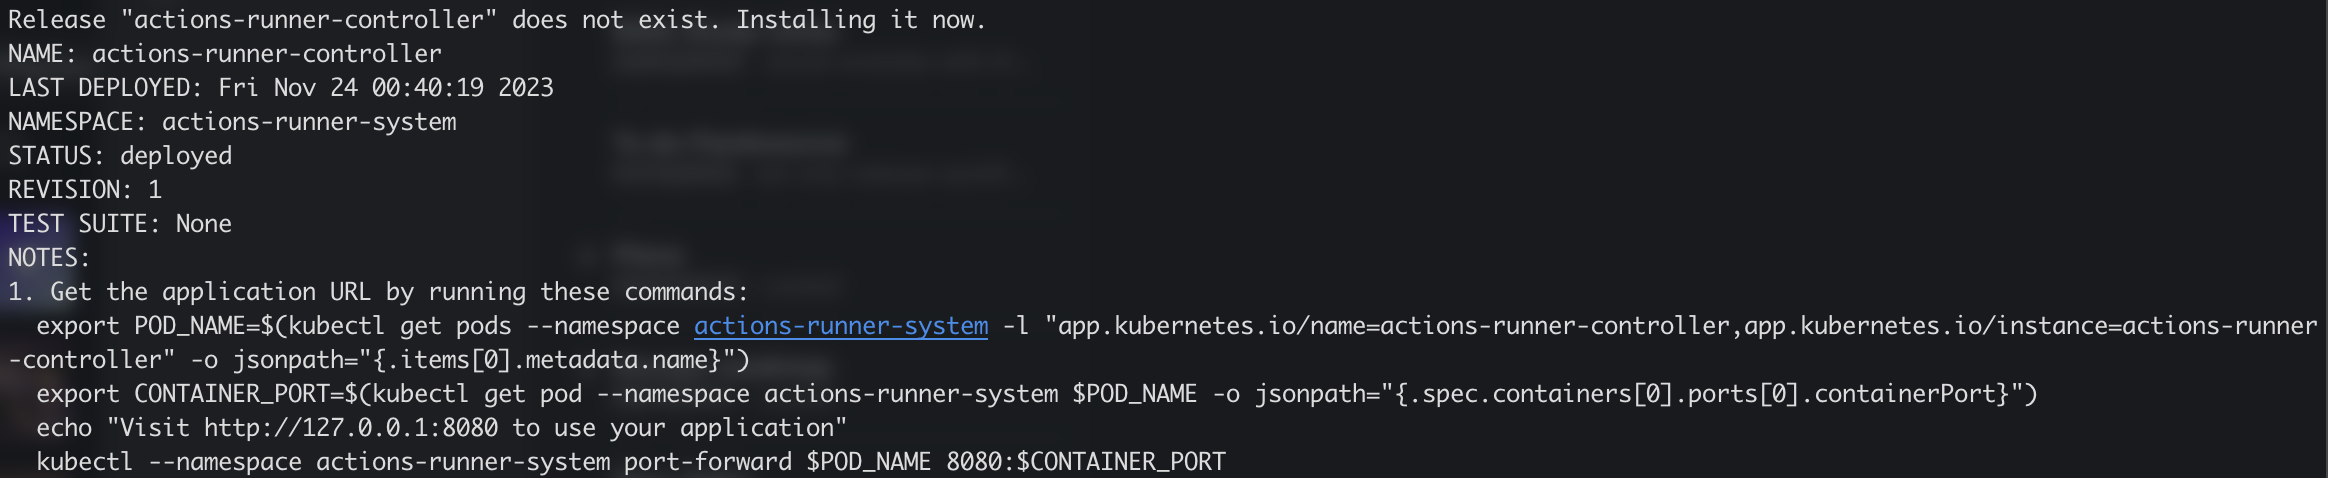
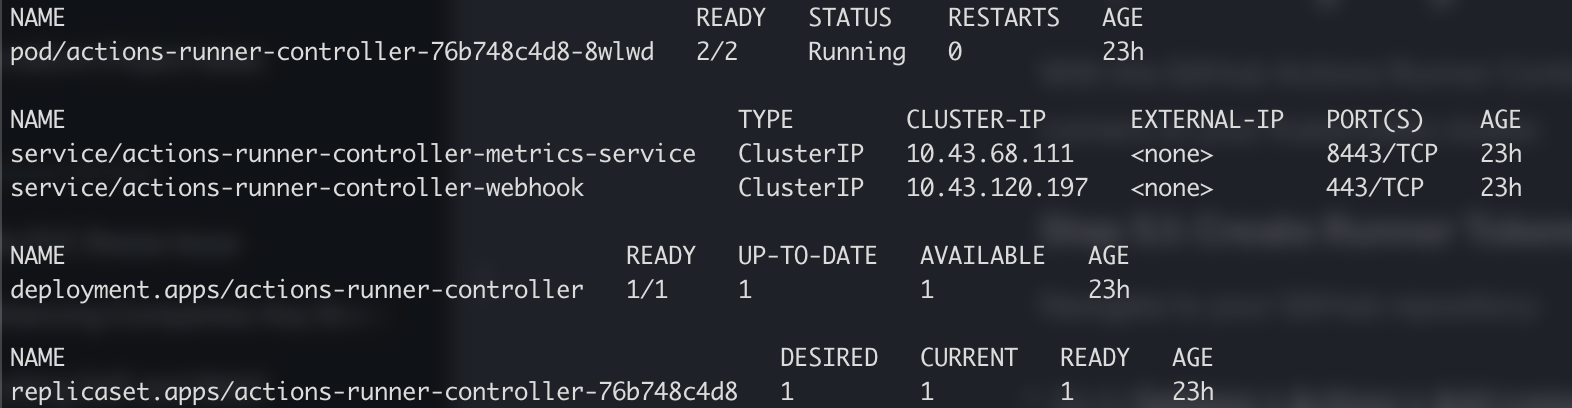
3. Now, run the below kubectl command to get all resources available in the actions-runner-system namespace.
kubectl get all -n actions-runner-systemThis output confirms the GitHub ARC installation.
Deploying and Configuring the GitHub Self-hosted Runner
With GitHub ARC set up, your focus now shifts to the vital component of powering your workflows within your Kubernetes cluster. You’ll deploy and configure a GitHub self-hosted runner to bring your automation to life.
To deploy and configure your GitHub self-hosted runner, carry out the following:
1. Create a manifest file called github-arc-demo.yaml (arbitrary) with your preferred editor, add the following configurations, and save the file. Ensure you replace the repository eshiettjoseph/GitHub-arc-demo with yours.
This configuration creates your GitHub self-hosted runner (demo-runner) with the kind of RunnerDeployment and configures it to run against your repository with a single replica.
# Define the Kubernetes API version and resource kind for the GitHub Actions Runner Deployment
apiVersion: actions.summerwind.dev/v1alpha1
kind: RunnerDeployment
metadata:
  # Specify a unique name for the GitHub Actions Runner Deployment
  name: github-arc-demo
spec:
  # Set the number of desired replicas for the GitHub Self-Hosted Runner
  replicas: 1
  template:
    spec:
      # Specify the GitHub repository to associate with the Runner
      repository: eshiettjoseph/GitHub-arc-demo
      labels:
        # Assign a custom label for identifying and categorizing the Runner
        - demo-runner
2. Now, execute the following command to apply the manifest file (github-arc-demo.yaml) to your cluster.
kubectl apply -f github-arc-demo.yamlOnce applied, you’ll see the following output as confirmation.

3. Run the command below to confirm the deployment. This command fetches (get) all resources with the kind RunnerDeployment in the default namespace.
kubectl get runnerdeploymentAs shown below, the github-arc-demo RunnerDeployment is found and confirmed.

4. Lastly, navigate to your repository on GitHub (Settings → Actions → Runners), and you’ll see a single Runner available.
The following confirms that your GitHub self-hosted runner is running against your repositories properly. Note down the runner name, as you’ll need it later for confirmation.

Testing the GitHub Self-hosted Runner
You’ve meticulously set up and configured the GitHub self-hosted runner, which is already a milestone. But, like a newly built bridge that undergoes rigorous testing to ensure its structural integrity, you must validate the reliability and effectiveness of your GitHub Self-hosted Runner.
To test your GitHub self-hosted runner, you’ll create a GitHub workflow to run in your GitHub repository, as follows:
1. Create a folder called .github/workflows in your GitHub repository, a standardized and recognized location for storing workflow configuration files.
This folder structure is crucial for GitHub Actions to detect and execute workflows associated with your repository automatically.
2. Next, create a file named test.yaml in the .github/workflows folder, and add the following sample workflow to the file.
This workflow is designed to run manually through the Actions tab, providing flexibility for on-demand execution. The primary purpose is to validate that the self-hosted runner is operational and can execute workflows successfully.
name: Test
on:
# Allows running your workflow manually from the Actions tab
workflow_dispatch:
jobs:
# Contains a single job called "test"
test:
runs-on: demo-runner
steps:
# Checks out the repository under $GITHUB_WORKSPACE
- uses: actions/checkout@v2
- name: Display text
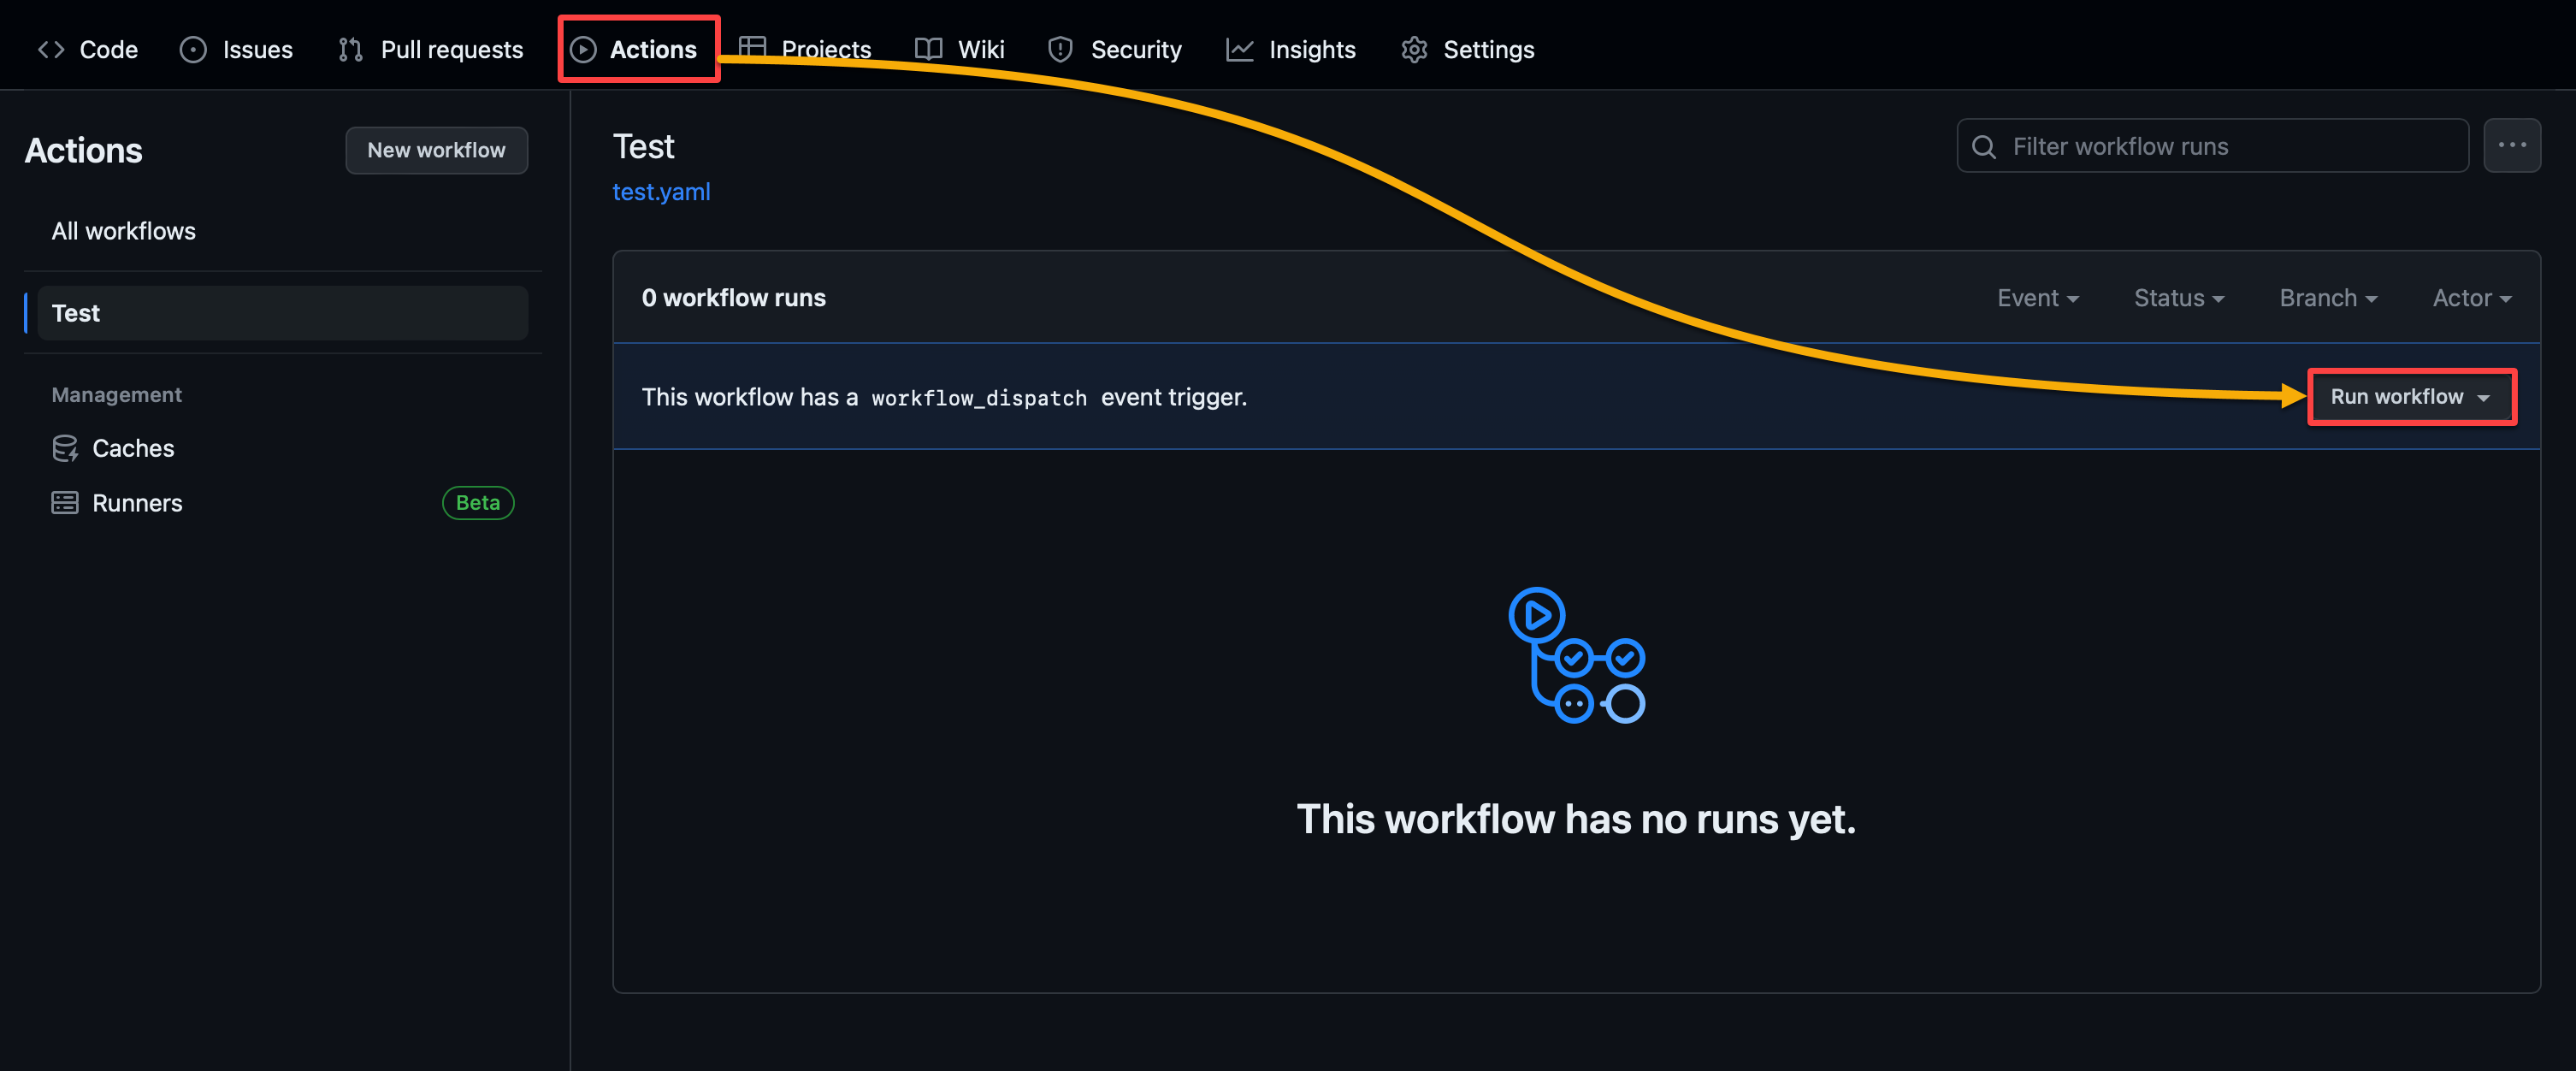
run: echo Github self-hosted runner working3. On GitHub, navigate to the Actions tab and click Run workflow from the page showing a workflow called Test, with a workflow_dispatch event trigger.
This action lets you manually run your workflow.
If everything works in your workflow, you’ll have the following output.

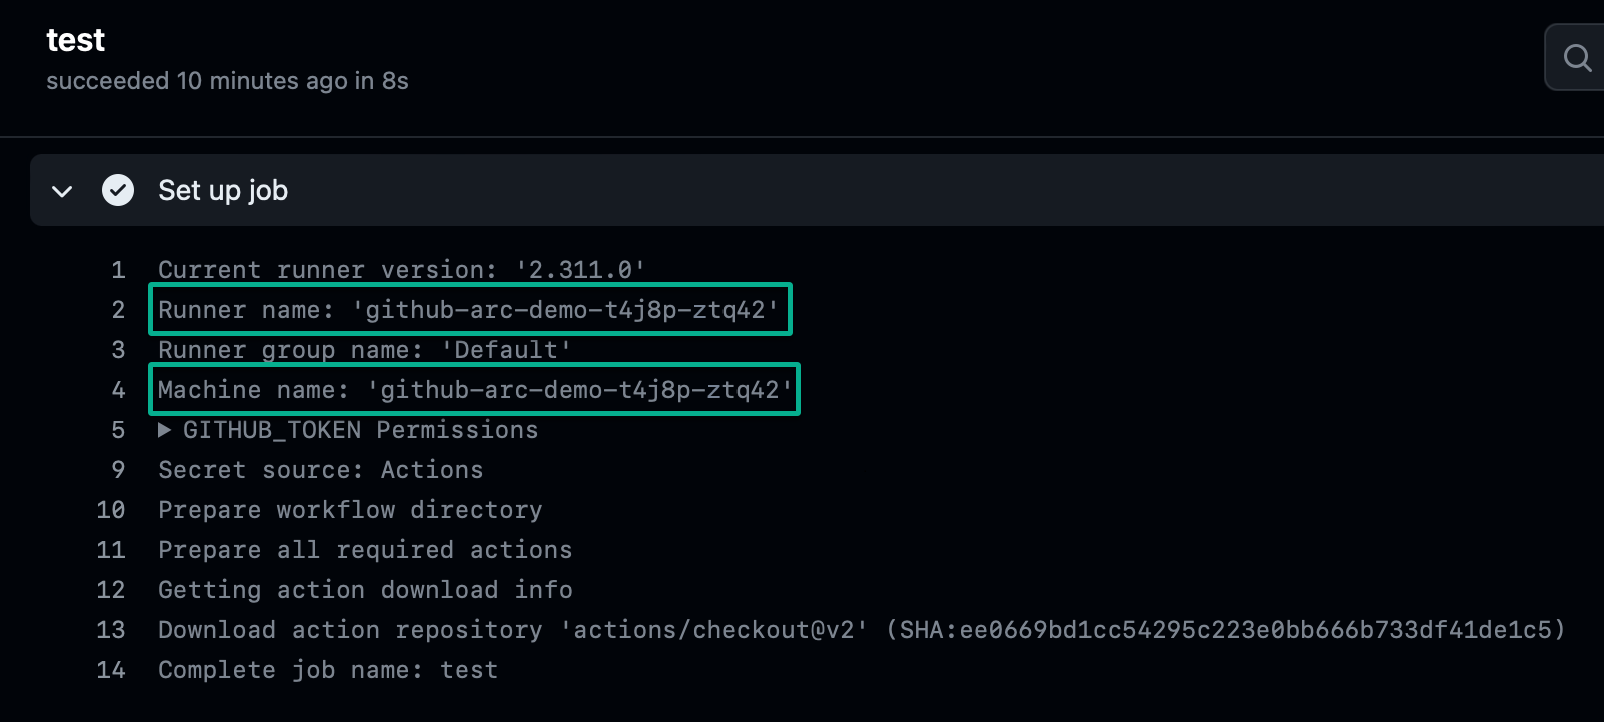
4. Finally, reconfirm the runner is in use by checking the workflow logs. As indicated below, logs from the Set up job step show the Runner name and Machine name.
Confirm that you see the one you noted in step four of the “Deploying and Configuring the GitHub Self-Hosted Runner” section.
Conclusion
In this tutorial, you’ve learned to set up the GitHub ARC, providing a centralized control point for orchestrating your workflows. Following that, you touched on deploying and configuring your GitHub self-hosted runner, turning it into a star performer in your development pipeline.
You now have a streamlined and adaptable workflow that aligns with your needs. But moving forward, why not expand your knowledge by exploring advanced GitHub Actions features? Customize workflows for different scenarios and continuously optimize your CI/CD processes.